What are the Different AT&T Email Server Settings? Explained

ATT Email Server Settings
Sep 12, 2023      Luis Parker      SBCGlobal email

AT&T webmail is one of the most popular email clients of Yahoo, and it has a huge user base. If you want to keep your communication intact, it can help you send and receive personal and professional emails. However, to make it work for you, make sure that the ATT email server settings are configured correctly.

In case you are not sure what settings need to be configured, here is a friendly post for you that can provide you with the required insights. Here, we will discuss all important ATT email server settings in a comprehensive manner so that even the users who are not tech-savvy can also perform the setting procedure. So, let’s start!

AT&T Webmail: A Brief Description

Before getting started with the AT&T web hosting email server settings, it is important to gain an idea about the webmail itself. It is basically an online email client powered by the internet giant Yahoo. By signing into your account, you can access its incredible features like email, access to the contact list of your web browser, calendar, and much more.

All you need is to sign into your ATT webmail, and you will find a smooth interface that is super-easy to navigate. Furthermore, you can get updates on your favorite topics, interesting articles, and new stories to keep yourself updated and feed yourself with a daily dose of entertainment. The incredible interface can make the user experience pleasant for you.

SBCGlobal ATT Email Login 

Getting Started With the ATT Email Server Settings

First of all, you need to open your email application on your system and follow these steps:

  • When in your account, move to the Settings section and select the Add Account option.
  • Moving ahead, you will see the list of email providers, wherein you have to select Others.
  • When in the username section on the next screen, enter your accurate email address.
  • Thereafter, enter your password in the Password area.
  • After following these steps, you can move to the Manual Setup option.
  • In the manual setup, you can configure the incoming and outgoing mail server settings.

Dial Toll Free Number : +1-(877)-200-2212

SMTP Settings For AT&T Webmail – Outgoing Mail Server Settings

SMTP settings for an email client are configured for outgoing messages. It serves the purpose of sending emails when establishing communication. Some important SMTP Webmail server settings are:

  • You will see the server address as smtp.mail.att.net.
  • The AT&T email address will be username@att.net.
  • You need to choose a strong ATT webmail password.
  • The port number used in this setting is 465 (With SSL).
  • Authentication is required when configuring the settings.
  • You can have a max of 100 connections a day or 500 emails a day.
AT&T Webmail POP3 and IMAP Settings – Incoming Mail Server Settings

POP3 and IMAP settings are used to receive emails and are meant for incoming messages. They are quite different from each other; however, both settings are used to ensure safe and easy access to the emails. The AT&T web hosting email server settings will be applicable for the following domains:

  • @ameritech.net
  • @snet.net
  • @swbell.net
  • @wans.net
  • @currently.com
  • @bellsouth.net
  • @sbcglobal.net
  • @flash.net
  • @att.net
  • @nvbell.net
  • @pacbell.net
  • @prodigy.net
AT&T Webmail POP3 Settings

Now that you know the applications of the settings, let’s have a look at different POP3 settings in AT&T webmail:

  • The POP3 host will be inbound.att.net.
  • The port in the POP3 server setting will be 995.
  • It Requires SSL.
  • The POP3 full email address can be noticed as username@domainname.com. Here, the user name is the name of the user, and the domain name can be any of the application domains listed above.
  • You need to create a secure mail key for the POP3 password. It can be the email account password for some ESPs.
IMAP Settings For AT&T Webmail

After discussing the POP3 settings, we can now proceed further to get a glimpse of the IMAP settings. In the manual setup, the IMAP setting for AT&T webmail will be as follows:

  • In the IMAP server section, you need to enter imap.mail.att.net.
  • The security type here will be None.
  • Coming to the IMAP port, you need to enter 993.
  • Here, the Secure Port will be 993, and the Security type is SSL/TLS (Accept all certificates).
  • On the other hand, the Insecure Port will be 143, and the security type: None (Accept all certificates).
  • Thereafter, you will need to fill in the IMAP username and password with the correct information.

After completing this procedure, select Done, and you are good to go with this procedure

How To Configure ATT Email Server Settings For iPhone?

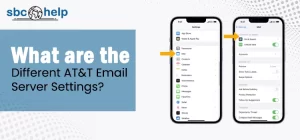
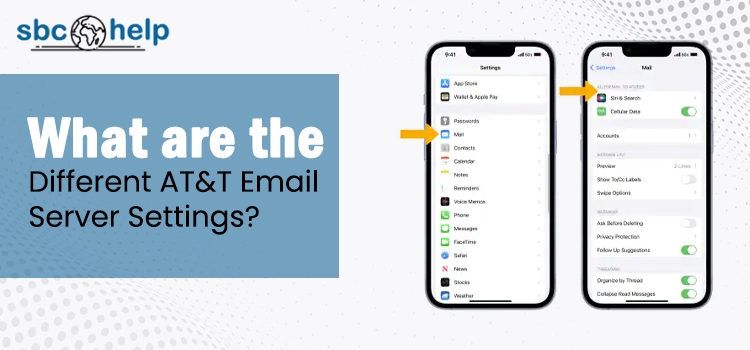
If you are an iPhone user, you might want to keep your communication handy on your mobile device. You can achieve this by setting AT&T mail server settings on your iPhone by following the below-explained process:

  • Initially, make sure that your iPhone is charged and is connected to a stable Internet connection.
  • After that, go to the Settings section to move ahead.
  • When in the settings section, locate and click on the Mail option.
  • Moving ahead, move to the Accounts section and then select Add Account, which will show up on the next page.
  • It will show the list of the different email service providers;
  • however, you won’t be able to locate the AT&T option. In such a case, you need to select the Other option.
  • Thereafter, select the option labeled Mail Account.
  • Here, you will have to provide information related to your account, which includes your email address, password, name, description, etc.
  • Once you have entered this information correctly, click the Next button.
  • Here, you can also choose POP or IMAP based on your preference. The toggle available on the top of the screen can also help you.

Now, enter the following areas with the relevant information:

Incoming Mail Server Settings
  • Host Name: imap.mail.att.net.
  • Username: Email address of AT&T.
  • Password: A strong password for the email.
Outgoing Mail Server Settings
  • Host Name: smtp.mail.att.net.
  • Username: Email address of AT&T.
  • Password: A strong password for the email.
    1. In certain cases, you may receive a text like Cannot Verify Server Identity. Click the Continue button in such a scenario.
    2. In the end, save the changes you have made to the ATT email server settings for Mac.

Once you complete this procedure, the settings will appear on your iPhone screen, and you need to verify it for a final time.

How To Configure AT&T Mail Server Settings On Android Device? 

After seeing the procedure to set ATT mail server settings on an Android device, let’s implement the steps for an Android device:

  • In the first place, go to the app Settings on your device.
  • After that, move down a bit and click on Accounts or Accounts and Sync option based on your current Android version.
  • Moving ahead, choose Add Account or click the + icon to add an account.
  • Here, you have to enter your email address and click the Next button.
  • Proceeding further, choose IMAP as your account type.
    Thereafter, enter your account password correctly and hit the Next button.
  • Now, enter the incoming server setting as:
    1. IMAP server: imap.mail.att.net.
    2. Security type: SSL/TLS
    3. Port: 993
  • Again, hit the Next button once you have provided the required settings.
  • Following the same procedure, you can set your outgoing server settings with the following configuration:
    1. SMTP server: smtp.mail.att.net
    2. Security type: SSL/TLS
    3. Port: 465
  • Hit the Next button, and it will take you to the next step.
  • Here, you can enter your preferences related to the frequency and notification. Click Next.
  • Name your account and also enter the display name.
  • In the end, click Next and then Done to end this process.

Ending Words! 

This post can help you configure your ATT mail server settings by implementing the steps described in this post. In case you have any kind of trouble, professional assistance is available just a call away.

Frequently Asked Questions (FAQ’s)

AT&T webmail can help you send and receive emails for both personal and professional email. Besides, it is a reliable way to store your important messages online securely.

AT&T email can stop working when your device gets piled up with cookies and cache. Sometimes, Internet connectivity can also be a possible reason.

If you have opted for ATT webmail for sending emails, you can attach up to a single email message wherein no file size should exceed 25MB.

Yes! You can get it done with ease. All you need to do is select the Settings option and then the Go option. Here, you will be able to locate the forwarding option, and you can forward your ATT mail to Outlook using it.

If you want professional assistance in configuring your ATT email server settings, then you can contact the ATT helpline to connect with a professional. They can guide you with step-by-step assistance until the job is done.

Related Posts
Keep SBCGlobal Email active

SBCGlobal Mail is a leading mailing service provider, which can be an excellent option for...

READ MORE
ATT Email Server Settings

AT&T webmail is one of the most popular email clients of Yahoo, and it has...

READ MORE
Author Image

We are an independently serving third-party service provider offering our services to our users and customers. We have no connection or affiliation with any brand, whatsoever. Neither should it be implied, nor it should be assumed by anybody. The logos and images of any brand on our website is an Intellectual property of the respective copyright holders and proprietor